Core Animation Layered Clock
October 12, 2009I wanted to get into Core Animation a bit over the weekend and decided to write a simple digital clock. With the help from Richard I set out to hack it up and figured it might be useful for others just starting out with Core Animation.
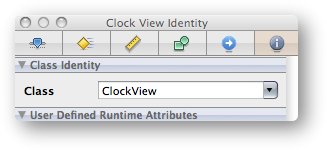
After creating a normal Cocoa Application and setting up a custom view in Interface Builder it’s time to setup the layers that will make up the final interface. Make sure that you set the custom view to your class so that it is actually used:
Layers in Core Animation are built up as a tree where the layer you set to your view with setLayer: is the root layer. All other layers are added as sublayers to the root layer or another layer with addSublayer:. In the code snippets below backgroundLayer is my root layer.
- (CALayer *)setupLayers
{
    backgroundLayer = [self setupBackgroundLayer];

    [backgroundLayer addSublayer:[self setupClockFaceLayer]];
    [backgroundLayer addSublayer:[self setupBorderLayer]];
    [backgroundLayer addSublayer:[self setupGlossLayer]];

    return backgroundLayer;
}

- (id)initWithFrame:(NSRect)frame
{
    self = [super initWithFrame:frame];
    if (self) {
        clockTimer = [[ClockTimer alloc] init];

        [self setLayer:[self setupLayers]];
    }
    return self;
}

- (void)awakeFromNib
{
    [self setWantsLayer:YES];
}
ClockTimer is a simple class that updates the string displaying the time once a second. This string is available through the property outputString on the ClockTimer object.
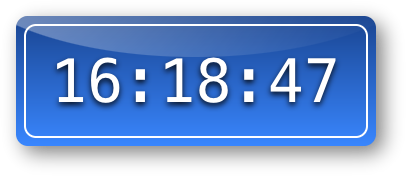
As you can see the clock is built up from four different layers: The background layer, a clock face layer, a border layer and finally a gloss layer adding the nice shine.
The Background Layer:
The background layer is created as a CAGradientLayer to give the clock background the nice blue gradient. This layer type was added in 10.6 so it won’t work on earlier versions of Mac OS X but should be fairly straight forward to do manually.
In order to help with positioning of layers Core Animation comes with the notion of Layout Managers which can be added to a layer in order to layout its sublayers. The CAConstraintLayoutManager lets us set constraints on the layers sublayers in order to control how they are positioned. In this case the constraints will be set on the clock face to make it centered on the background.
- (CALayer *)setupBackgroundLayer
{
    backgroundLayer = [CAGradientLayer layer];

    CGColorRef gradientColor1 = CGColorCreateGenericRGB(13.0f / 255.0, 116.0f / 255.0, 1.0, 1.0f);
    CGColorRef gradientColor2 = CGColorCreateGenericRGB(0.0f, 53.0f/255.0f, 126.0f/255.0f, 1.0f);

    NSArray *colors = [NSArray arrayWithObjects:(id)gradientColor1, (id)gradientColor2, nil];

    CFRelease(gradientColor1);
    CFRelease(gradientColor2);

    [(CAGradientLayer *)backgroundLayer setColors:colors];
    [backgroundLayer setCornerRadius:12.0f];

    CAConstraintLayoutManager *layout = [CAConstraintLayoutManager layoutManager];
    [backgroundLayer setLayoutManager:layout];

    return backgroundLayer;
}
The ClockFace Layer:
Core Animation comes with several layer types to help us with various tasks. One of these is the CATextLayer which like the name suggests, make it really easy to output text. It also makes it really easy to customize how the text is displayed by setting font and font size. Using the normal shadow properties from CALayer you can add a nice drop shadow on the text.
Using Cocoa bindings I connect the text layers string property with the outputString on my ClockTimer. This way the layer will automatically redraw itself everytime the timer updates the output string.
This is also where we setup the constraints mentioned above to make sure that the text is centered in relation to its super layer (in this case the background).
- (CALayer *)setupClockFaceLayer {
    CATextLayer *clockFaceLayer = [CATextLayer layer];
    [clockFaceLayer bind:@"string" toObject:clockTimer withKeyPath:@"outputString" options:nil];
    [clockFaceLayer setFont:@"Menlo"];
    [clockFaceLayer setFontSize:60.0f];
    [clockFaceLayer setShadowOpacity:.9f];

    // Constrain the text layer in the middle
    CAConstraint *constraint = [CAConstraint constraintWithAttribute:kCAConstraintMidX
                                                          relativeTo:@"superlayer"
                                                           attribute:kCAConstraintMidX];
    [clockFaceLayer addConstraint:constraint];

    constraint = [CAConstraint constraintWithAttribute:kCAConstraintMidY
                                            relativeTo:@"superlayer"
                                             attribute:kCAConstraintMidY];
    [clockFaceLayer addConstraint:constraint];

    return clockFaceLayer;
}
The Border Layer:
There are likely other ways of doing this but by using a separate layer I can use built in functionality to draw a border around a layer. I make the layer slightly smaller than the background layer, set its corner radius to the same value used for the background and simply set it to draw its border with a white color.
- (CALayer *)setupBorderLayer
{
    CALayer *borderLayer = [CALayer layer];
    CGRect borderRect = CGRectInset([self frame], 8.0f, 8.0f);
    [borderLayer setCornerRadius:12.0f];
    [borderLayer setBorderColor:CGColorGetConstantColor(kCGColorWhite)];
    [borderLayer setBorderWidth:2.0f];
    [borderLayer setFrame:borderRect];

    return borderLayer;
}
Notice that I do not have to set any constraints here as I create the layer frame from simply shrinking the frame size on all sides which ensures it will be set in the middle already.
The Gloss Layer:
As a final touch I wanted to add the shine to give the clock a glossy look. The simplest way I could figure out to do this was to create a transparent image in Photoshop and setup the layer to draw it. Optimally it should be generated in code or at least use a scalable image to make the clock resizable without loosing any quality in the gloss layer.
Even if we set the same corner radius as the background layer the layer will happily draw the image outside of this unless we call setMasksToBounds to ensure that it doesn’t draw the image outside of the rounded corners.
- (CALayer *)setupGlossLayer
{
    CALayer *glossLayer = [CALayer layer];
    NSString *filePath = [[NSBundle mainBundle] pathForResource:@"clock-gloss" ofType:@"png"];
    NSURL *fileURL = [NSURL fileURLWithPath:filePath];

    CGImageSourceRef glossySource = CGImageSourceCreateWithURL((CFURLRef)fileURL, NULL);
    CGImageRef glossyImage = CGImageSourceCreateImageAtIndex(glossySource, 0, NULL);
    CFRelease(glossySource);
    [glossLayer setContents:(id)glossyImage];
    CFRelease(glossyImage);

    [glossLayer setOpacity:0.8f];
    [glossLayer setCornerRadius:12.0f];
    [glossLayer setMasksToBounds:YES];
    [glossLayer setFrame:[self frame]];

    return glossLayer;
}
Finally I subclassed NSWindow in order to turn off the window decoration and shape the window as the background layer.
- (id)initWithContentRect:(NSRect)contentRect
                styleMask:(NSUInteger)aStyle
                  backing:(NSBackingStoreType)bufferingType
                    defer:(BOOL)flag
{
    self = [super initWithContentRect:contentRect
                            styleMask:NSBorderlessWindowMask
                              backing:bufferingType
                                defer:flag];
    if (self) {
        [self setOpaque:NO];
        [self setBackgroundColor:[NSColor clearColor]];
        [self setMovableByWindowBackground:YES];
        [self setLevel:NSPopUpMenuWindowLevel];
    }

    return self;
}
NSBorderlessWindowMask makes the window draw without the border and setOpaque together with setting the background color to [NSColor clearColor]. Using the NSPopUpMenuWindowLevel ensures that the clock is always on top of other windows.
I hope you find this helpful and please make sure to subscribe to my feed if you did. I’ll do my best to answer any questions you might have in the comment section below.
The full source as an Xcode project can be browsed at: Github or downloaded.