Cocoa Prototyping with Webview
May 05, 2009While Interface Builder makes it really easy to quickly put together and test the overall design of your user interface it doesn’t help much when it comes to its overall flow. In any non-trivial application you are likely to have some custom views or view switching.
For example, say that you want to try out whether it makes sense to use a source list in order to navigate the application and have your content view switch based on what you select in it.
Wouldn’t it be great if you could try this without having to implement all the code necessary to display and navigate the source list and other views. Using HTML for prototyping can be a powerful, quick and easy solution that is easily available to Cocoa developers.
In order to make it even easier I created a WebView subclass called PrototypeView that displays a piece of HTML and sends a message to its delegate when the user clicks a link.
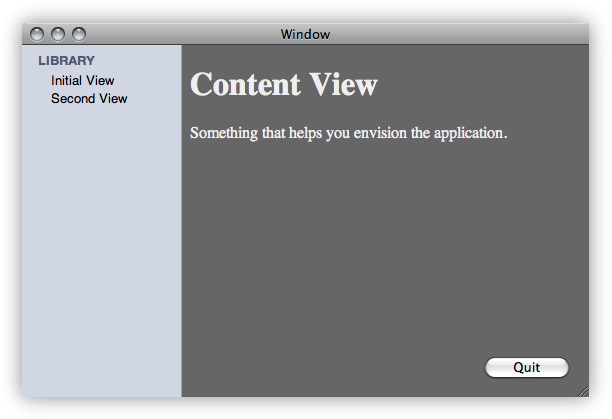
To give an idea of what it does, take a look at the following screenshot showing a basic prototype UI consisting of two suchs views embedded in a split view.
Using the PrototypeView is easy.
Step 1: Mock up the UI in Interface Builder
Using Interface Builder, create the UI you want and put custom views where you want to prototype using the PrototypeView.
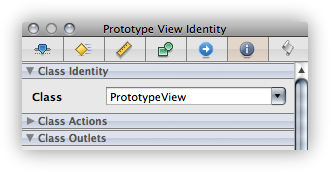
I used a class called AppController with two outlets to the prototype views by creating an NSObject subclass and set it up in Interface Builder by dragging an NSObject from the library and setting the class to AppController like above.
Step 2: Hooking the view up in the AppController
Back in XCode I create a subclass of NSObject called AppController and setup the two prototype views in its awakeFromNib by using the two method calls setPrototypeDelegate and loadBundleFile. In my example I used two prototype views called sidebarView and contentView and will use the AppController as my delegate.
- (void)awakeFromNib
{
    [sideBarView setPrototypeDelegate:self];
    [sideBarView loadBundleFile:@"sidebar"];

    [contentView setPrototypeDelegate:self];
    [contentView loadBundleFile:@"content1"];
}
Step 3: Prototype in HTML
Starting the application at this point will cause it to load the files sidebar.html and content1.html and display them. Now that the files are being loaded you can implement the prototyped UI portions in the HTML files. Here is the content of sidebar.html:
<html>
  <head>
    <link rel="stylesheet" href="sidebar.css" type="text/css" />
  </head>
  <body>
    <ul>
      <li><p class="header">LIBRARY</p>
        <ul>
          <li><a href="method:showViewOne">Initial View</a></li>
          <li><a href="method:showViewTwo">Second View</a></li>
        </ul>
      </li>
    </ul>
  </body>
</html>
Step 4: Adding the methods in AppController
Notice the special links to method:showViewOne, clicking this will make the PrototypeView look if its delegate responds to showViewOne and send the message to it if it does.
- (void)showViewOne
{
    [contentView loadBundleFile:@"content1"];
}

- (void)showViewTwo
{
    [contentView loadBundleFile:@"content2"];
}
That’s it, happy prototyping!
For a closer look you can see the PrototypeView source code.
I’d love any feedback on how to improve this and possibly even supporting using JavaScript to communicate both ways with the HTML view in order to let the application update the views dynamically.